

Introduction
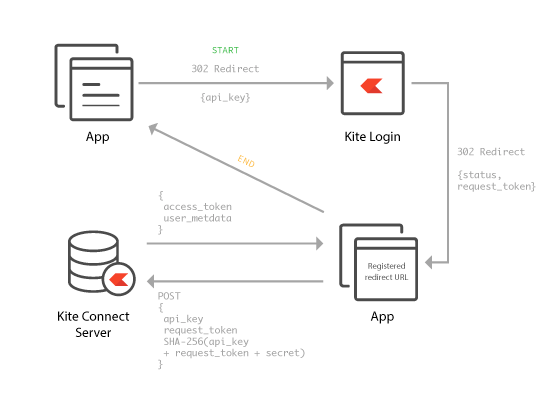
Wanted to connect my Android side project to Kite Connect API (Stock Broker). The authentication mechanism to obtain an access token looks like this.
Since I don't have a web server I decided to use Firebase Cloud Functions to handle the redirect for the request token and exchange it for an access token that can be returned to the client. Let's get some configurations out of the way before we start writing the code.
Prerequisites
- Kite Connect 3 Account
- Firebase Account
- This article assumes an intermediate familiarity with npm, Javascript, Kotlin, Firebase and Android.
Kite Connect 3 Account
First, we need to create a kite connect account and then add credits to it. This will allow us to use the APIs for fetching the quotes and sending orders.
Firebase Account
Second, we need to create a Firebase account and then create a project. Next, activate the Blaze plan on this project.
Even though a lot of services can be accessed on the Spark (Free) plan. Cloud functions only work on a Blaze (Pay as you go) plan. Even on the Blaze plan, you get Two Million invocations per month for free.
Defining the Auth Flow

The flow is pretty straightforward.
- When the user clicks on login. We launch the Kite Connect public login URL in a Webview.
- The authentication is taken care of, by Kite Connect. Once the flow completes, they redirect the user to a preconfigured redirect URL that you provide in the app config on the Kite Connect portal. This redirect URL will be our endpoint that invokes the cloud function.
- The cloud function endpoint receives a request token in the request. It uses this to exchange an access token from Kite Connect API.
- Once our cloud function receives the token, it responds with a redirect to an agreed-upon URL. This URL will be intercepted and handled by our app as a deep link. This URL will contain the access token as a query parameter that the app can parse and store.
This completes our authentication flow with Kite Connect. Using the access token we received, we can now call the desired endpoints to get price quotes, portfolio positions, and place orders.
Initiating the Authentication Flow on Android
As per the Kite Connect documentation, the login will start when the user navigates to the public Kite login endpoint that looks like this
https://kite.zerodha.com/connect/login?v=3&api_key=xxxDon't forget to replace xxx it with your API Key that you got from the Kite Connect App dashboard.
Let's say we want to call this URL when the user clicks a button in our Android app. The code looks something like this
loginButton.setOnClickListener {
            val API_KEY = "redacted"
            val loginURL = "https://kite.zerodha.com/connect/login?v=3&api_key=$API_KEY"
            startActivity(Intent(Intent.ACTION_VIEW, Uri.parse(loginURL)))
        }
When the click happens on loginButton a web view will open a webpage that will look like the following screenshot
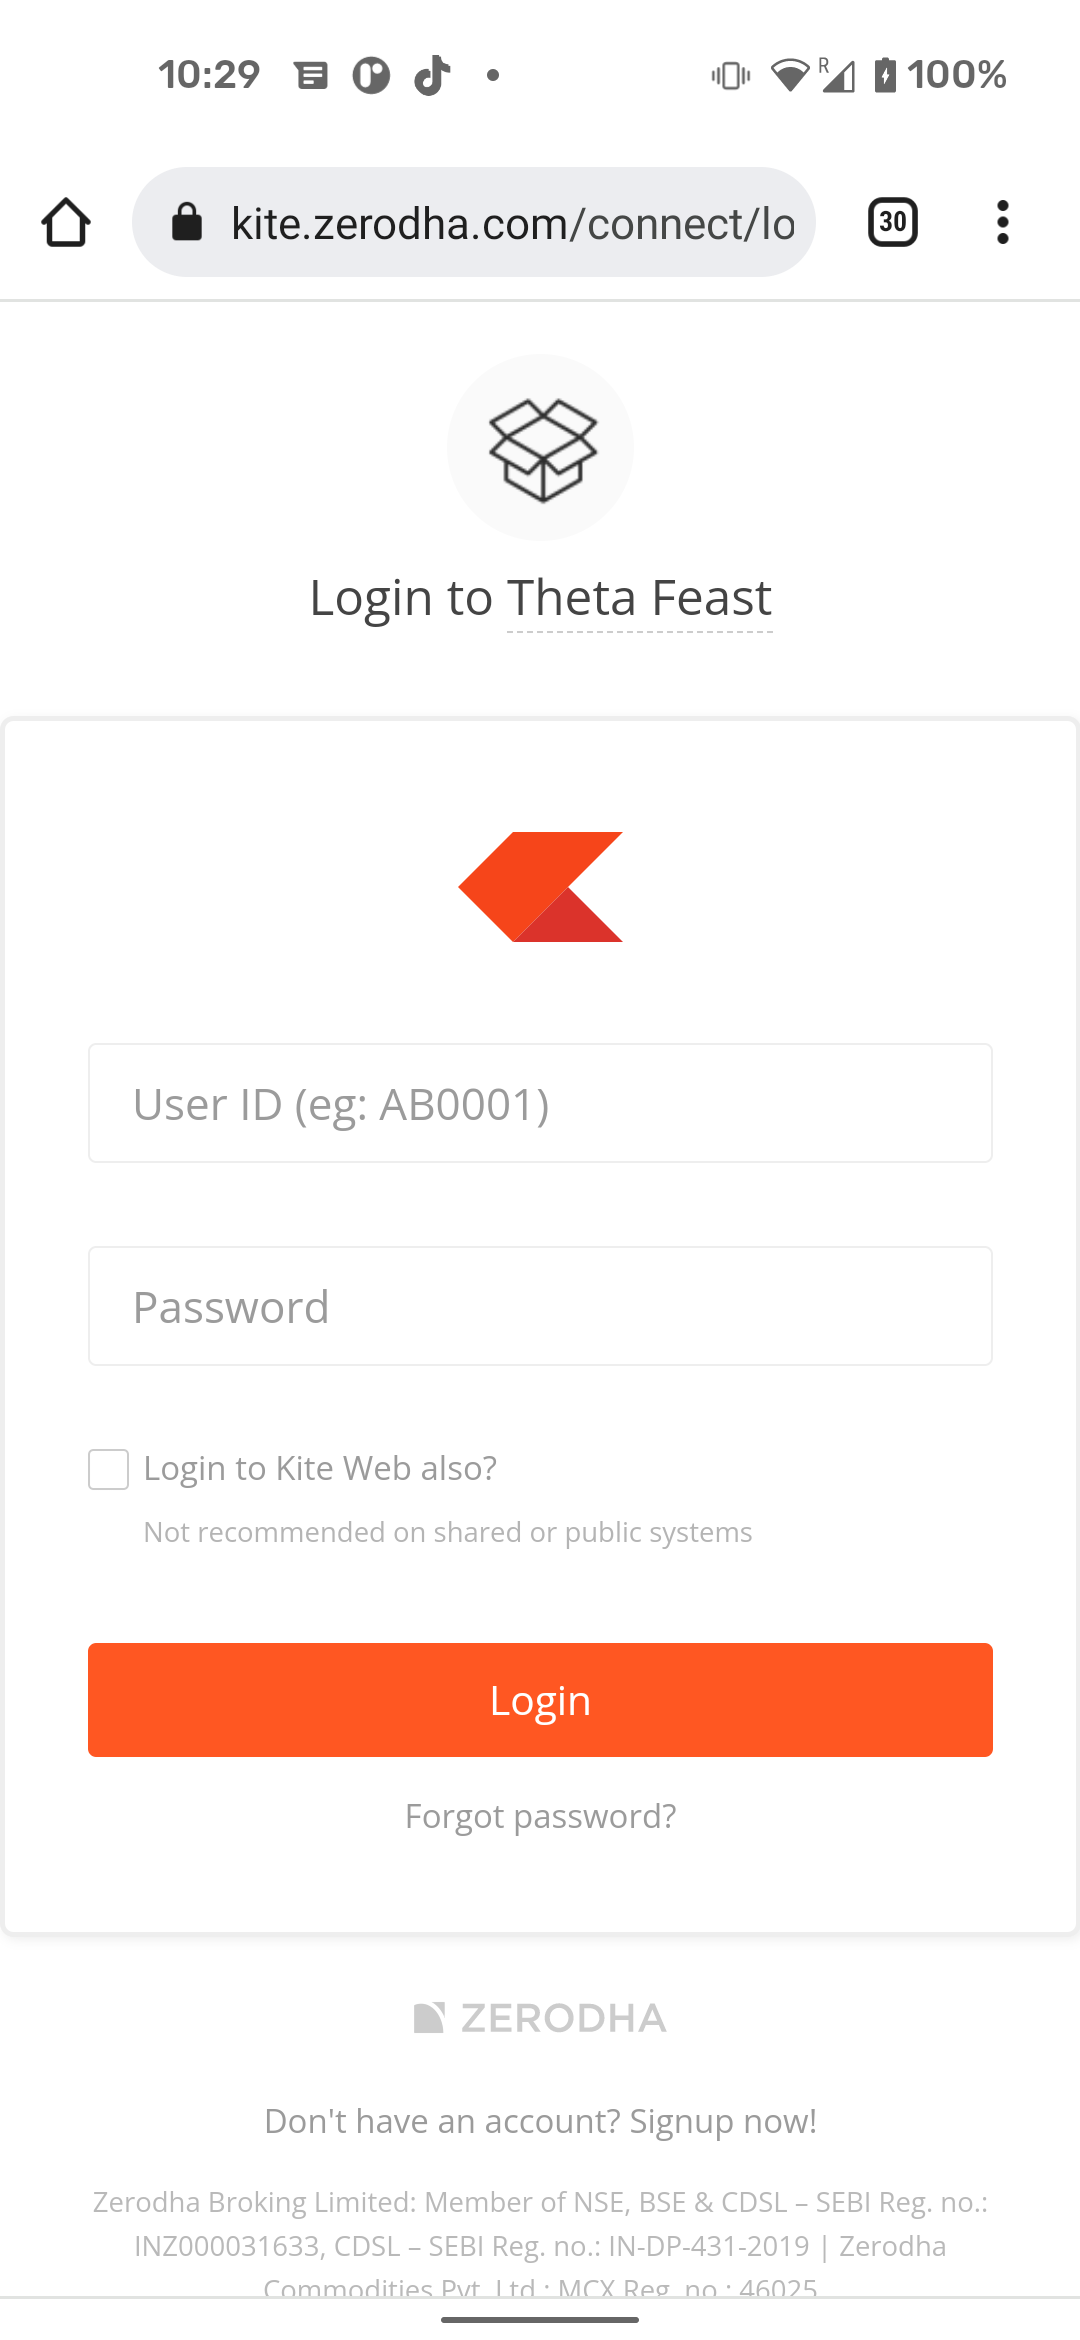
Once you log in with your Zerodha credentials successfully. It will redirect to your cloud endpoint so let's sping that up, next.
Getting started with Cloud Functions
If you have never worked cloud functions before, I would recommend following this quick guide to setup a working cloud function on your machine in no time.
Once you have a working cloud function, you can go ahead and write the function with our business logic for exchange the token.
Declaring our Cloud Function
In the index.js file, add a new function and call it zerodhaAuthCallback like this
const functions = require("firebase-functions");

exports.zerodhaAuthCallback = functions.https.onRequest((request, response) => {
  // business logic goes here
});
With this we have defined the endpoint for our redirect URL that would look something like this
https://us-central1-MY_PROJECT.cloudfunctions.net/zerodhaAuthCallback
Remeber that MY_PROJECT here will be your firebase project name.
Preparing for Token Exchange
As per the documentation, a successful login redirect comes with a request token in the query param of the redirect url.
In order to exchange the token, we have to POST the request token and checksum to this endpoint https://api.kite.trade/session/token
Generating the Checksum
The checksum as defined by the documentation is a SHA-256 of api_key + request_token + api_secret
API_KEY and API_SECRET are available in the Kite Connect dashboard.
First let us define a function to generate a SHA-256 hash of any given string.
// Define a function sha256 which takes a string and returns the hash
var sha256 = function sha256(ascii) {
  function rightRotate(value, amount) {
    return (value>>>amount) | (value<<(32 - amount));
  }

  const mathPow = Math.pow;
  const maxWord = mathPow(2, 32);
  const lengthProperty = "length";
  let i; let j; // Used as a counter across the whole file
  let result = "";

  const words = [];
  const asciiBitLength = ascii[lengthProperty]*8;

  //* caching results is optional - remove/add slash from front of this line to toggle
  // Initial hash value: first 32 bits of the fractional parts of the square roots of the first 8 primes
  // (we actually calculate the first 64, but extra values are just ignored)
  let hash = sha256.h = sha256.h || [];
  // Round constants: first 32 bits of the fractional parts of the cube roots of the first 64 primes
  const k = sha256.k = sha256.k || [];
  let primeCounter = k[lengthProperty];
  /* /
    var hash = [], k = [];
    var primeCounter = 0;
    //*/

  const isComposite = {};
  for (let candidate = 2; primeCounter < 64; candidate++) {
    if (!isComposite[candidate]) {
      for (i = 0; i < 313; i += candidate) {
        isComposite[i] = candidate;
      }
      hash[primeCounter] = (mathPow(candidate, .5)*maxWord)|0;
      k[primeCounter++] = (mathPow(candidate, 1/3)*maxWord)|0;
    }
  }

  ascii += "\x80"; // Append Ƈ' bit (plus zero padding)
  while (ascii[lengthProperty]%64 - 56) ascii += "\x00"; // More zero padding
  for (i = 0; i < ascii[lengthProperty]; i++) {
    j = ascii.charCodeAt(i);
    if (j>>8) return; // ASCII check: only accept characters in range 0-255
    words[i>>2] |= j << ((3 - i)%4)*8;
  }
  words[words[lengthProperty]] = ((asciiBitLength/maxWord)|0);
  words[words[lengthProperty]] = (asciiBitLength);

  // process each chunk
  for (j = 0; j < words[lengthProperty];) {
    const w = words.slice(j, j += 16); // The message is expanded into 64 words as part of the iteration
    const oldHash = hash;
    // This is now the undefinedworking hash", often labelled as variables a...g
    // (we have to truncate as well, otherwise extra entries at the end accumulate
    hash = hash.slice(0, 8);

    for (i = 0; i < 64; i++) {
      // Expand the message into 64 words
      // Used below if
      const w15 = w[i - 15]; const w2 = w[i - 2];

      // Iterate
      const a = hash[0]; const e = hash[4];
      const temp1 = hash[7] +
                (rightRotate(e, 6) ^ rightRotate(e, 11) ^ rightRotate(e, 25)) + // S1
                ((e&hash[5])^((~e)&hash[6])) + // ch
                k[i] +
                // Expand the message schedule if needed
                (w[i] = (i < 16) ? w[i] : (
                  w[i - 16] +
                        (rightRotate(w15, 7) ^ rightRotate(w15, 18) ^ (w15>>>3)) + // s0
                        w[i - 7] +
                        (rightRotate(w2, 17) ^ rightRotate(w2, 19) ^ (w2>>>10)) // s1
                )|0
                );
      // This is only used once, so *could* be moved below, but it only saves 4 bytes and makes things unreadble
      const temp2 = (rightRotate(a, 2) ^ rightRotate(a, 13) ^ rightRotate(a, 22)) + // S0
                ((a&hash[1])^(a&hash[2])^(hash[1]&hash[2])); // maj

      hash = [(temp1 + temp2)|0].concat(hash); // We don't bother trimming off the extra ones, they're harmless as long as we're truncating when we do the slice()
      hash[4] = (hash[4] + temp1)|0;
    }

    for (i = 0; i < 8; i++) {
      hash[i] = (hash[i] + oldHash[i])|0;
    }
  }

  for (i = 0; i < 8; i++) {
    for (j = 3; j + 1; j--) {
      const b = (hash[i]>>(j*8))&255;
      result += ((b < 16) ? 0 : "") + b.toString(16);
    }
  }
  return result;
};
Now call this function within your cloud function like this
  const functions = require("firebase-functions");

exports.zerodhaAuthCallback = functions.https.onRequest((request, response) => {
  	// business logic goes here

	  const requestToken = request.query["request_token"];
      const apiKey = "redacted";
      const apiSecret = "redacted";
      const checkSum = sha256(apiKey+requestToken+apiSecret);


});
With the checksum generated and request_token parsed. We are ready to exchange the token with the Kite Connect API.
For the networking in my cloud function, I am using axios.
You can install axios with the following command:
npm install axios
Once installed, it is time to import the library in our cloud function. In the index.js file, modify it as shown below
const functions = require("firebase-functions");
const axios = require("axios").default; // ADD THIS LINE TO IMPORT AXIOS

exports.zerodhaAuthCallback = functions.https.onRequest((request, response) => {
  	// business logic goes here

	  const requestToken = request.query["request_token"];
      const apiKey = "redacted";
      const apiSecret = "redacted";
      const checkSum = sha256(apiKey+requestToken+apiSecret);


});
Next, we are going to call the kite endpoint like so
const functions = require("firebase-functions");
const axios = require("axios").default;


exports.zerodhaAuthCallback = functions.https.onRequest((request, response) => {

  const requestToken = request.query["request_token"];
  const apiKey = "a9ypfbjymtj2v9uf";
  const apiSecret = "h9wscbw1li9kuvtow1g2xjl4n9sa7wr0";
  const checkSum = sha256(apiKey+requestToken+apiSecret);
  const dataString =`api_key=${apiKey}&request_token=${requestToken}&checksum=${checkSum}`;
  const finalUrl = "https://api.kite.trade/session/token";
  axios({
    method: "post",
    url: finalUrl,
    headers: {
      "X-Kite-Version": 3,
    },
    data: dataString,
  }).then(function(res) {
    const accessToken = res.data["data"]["access_token"];
    response.redirect(`http://droidchef.app/callback/zerodha?access_token=${accessToken}`);
  }).catch(function(err) {
    functions.logger.error(err.message);
    response.send("Something went wrong");
  });
});
After making the network call, we wait for either a success or a failure and have respective blocks for both the cases.
If the request is successful, we respond with a redirect to this URL http://droidchef.app/callback/zerodha?access_token=${accessToken}
Now that the code is ready, it is time to deploy it and test it.
Deploying the Cloud Function to Production
If you followed the getting started guide correctly, and logged into Firebase CLI already. Then deployment can be done just with this command
$ firebase deploy --only functionsOnce it is deployed make sure you go ahead and enable the cloud function endpoint for public access.
This StackOverflow answer describes the steps to do it.
Handling the Deeplink in the Android App
This is the last piece of the puzzle that needs to be put in place to get the desired result.
In your AndroidManifest.xml declare the following intent-filter on the Activity that is supposed to intercept and handle the deep link.
        <activity android:name=".login.LoginActivity" android:exported="true">
            <intent-filter android:autoVerify="false">
                <action android:name="android.intent.action.VIEW" />

                <category android:name="android.intent.category.DEFAULT" />
                <category android:name="android.intent.category.BROWSABLE" />

                <data
                    android:pathPrefix="/callback"
                    android:path="/zerodha"
                    android:host="droidchef.dev"
                    android:scheme="https" />
            </intent-filter>
        </activity>
Now in your Activity, you can try to get the data passed in the deep link from the intent like this
class LoginActivity: AppCompatActivity() {

    override fun onCreate(savedInstanceState: Bundle?) {
        // ...
        val intentData = intent?.data
        intentData?.let {
            if (uri.pathSegments.contains("zerodha")) {
          val accessToken = uri.getQueryParameter("access_token")
        }
        }
        // ...
    }

}
Save that Access Token and use it while it is valid!
If you're implementing something with the Kite Connect API too, or have any feedback about this article, I'm just a DM away on Twitter – @droidchef


