
In this hands on tutorial, you will learn how to implement discord login on android using openID AppAuth SDK.
Introduction to OAuth
OAuth refers to an open standard for access delegation. Most of the applications now use it as a way to authenticate users into their platform. It takes away the need for users to have an identity on each app and instead allows them to use one identity in multiple places.
Technically speaking, the OAuth flow, in its simplest form, is only a bunch of network requests executed in a certain order with some specific parameters. Based on what happens during the flow, either you’ll get an access token (or a code from the provider) using which your user is authenticating, or you’ll be left high and dry with just an error code in your hand.
If you’re here and made it till this point, my machine learning model suggests that you’re interested in implementing OAuth using Discord as a provider for your Android App. Let’s get coding and implement the OAuth flow in your app.
Introduction to AppAuth SDK
While it is totally possible to implement the OAuth flow by hand, I am going to show you a library that does a bunch of heavy lifting for us already. It provides a direct mapping of requests and responses of the OAuth specifications in an idiomatic language style. Not just that, it also has convenient APIs available for common tasks like performing an action with fresh tokens.
It is called AppAuth-Android and is created and maintained by the OpenID foundation on Github.
Installing the SDK
As of writing this article, the latest version of the SDK available is 0.7.1 served via Bintray.
Just add this line in the dependencies section of your app module’s build.gradle file
dependencies {
     implementation 'net.openid:appauth:0.7.1'
}
or if you are using Kotlin DSL for your Gradle management you can import it like this
dependencies {
     implementation("net.openid:appauth:0.7.1")
}
Creating the Login Button
Add simple Button in your activity, clicking on which you will trigger the Discord login action.
discordLoginButton.setOnClickListener {
 	 loginWithDiscord()
}
This function is going to start the OAuth Flow for Discord. Before we can launch the flow, we need to do some configuration which you will find in the next section.
Initializing the Authorization Service
The AppAuth SDK must be instructed on how it should talk with the authorization service. In this case, Discord OAuth. There are two ways to do it. You can either create an instance of AuthorizationServiceConfiguration or use an OpenID Connect discovery document. While the latter is the preferred way of doing it, we’ll do it using the first option for simplicity.
Let’s start by defining our function loginWithDiscord()
fun loginWithDiscord() {

  val serviceConfig = AuthorizationServiceConfiguration(
    Uri.parse("https://discord.com/api/oauth2/authorize"),  // authorization endpoint
    Uri.parse("")  // token endpoint
  )

}
This creates a service configuration that tells that the authorization endpoint is https://discord.com/api/oauth2/authorize . This is standard for Discord and mentioned in their documentation here.
Creating the Request
Next, you will create the request to authenticate the user. To do that you will use the AuthorizationRequest.Builder. The constructor of this builder takes 4 inputs.
- Authorization Service Configuration – This is the configuration needed to start OAuth Flow and Exchange Tokens.
- Client ID – This is your applications’ client id, usually issued by the provider you are trying to integrate with.
- Response Type Value – This is the response type you are expecting after the successful authentication. It can be one of the following: Code, Token, ID Token.
- Redirect URI – The client’s redirect URI is used to get the callback from the authorization provider after the authorization request is completed.
Now that we know how to create a request let’s add the code for it in the loginWithDiscord() method
fun loginWithDiscord() {

  val serviceConfig = AuthorizationServiceConfiguration(
    Uri.parse("https://discord.com/api/oauth2/authorize"),  // authorization endpoint
    Uri.parse("")  // token endpoint
  )

  val clientId = "put your client id here"

  val authRequestBuilder = AuthorizationRequest.Builder(
    serviceConfig,  // the authorization service configuration
    clientId,  // the client ID, typically pre-registered and static
    ResponseTypeValues.CODE,  // the response_type value: we want a code
    Uri.parse(REDIRECT_URI)// the redirect URI to which the auth response is sent
  )

}
As you can see, we have only set up the builder and have not actually built the request yet. That’s because you need to add a few more things to this request.
A cool thing about OAuth is that it allows you to configure what information you want to request from the user. This is done via scopes. Here we will request two scopes namely, “email” and “identify”. You can find the full list of scopes that discord oauth provider supports here.
Go ahead and modify the loginWithDiscord() method so that it looks like this
fun loginWithDiscord() {

  val serviceConfig = AuthorizationServiceConfiguration(
    Uri.parse("https://discord.com/api/oauth2/authorize"),  // authorization endpoint
    Uri.parse("")  // token endpoint
  )

  val clientId = "put your client id here"

  val authRequestBuilder = AuthorizationRequest.Builder(
    serviceConfig,  // the authorization service configuration
    clientId,  // the client ID, typically pre-registered and static
    ResponseTypeValues.CODE,  // the response_type value: we want a code
    Uri.parse(REDIRECT_URI)// the redirect URI to which the auth response is sent
  )

  val discordScopes = listOf("identity", "email")

  val authRequest = authRequestBuilder
    .setScopes(discordScopes)
    .setCodeVerifier(null, null, null) // THIS IS A HACK, NOT RECOMMENDED, BUT NEEDED
    .build()

}
Now that we have our request, we should just go ahead and fire it, right? Technically you can – you’ll be taken to the Discord login page, where you can even login with your credentials. However, you will not get the authentication token yet! It is because we haven’t configured anything to receive the response from this request, yet. Let’s do that next.
Capturing the Redirect in App
Since we will be launching a WebView to authenticate our users, we need a way to bring the user back into the app after authentication, irrespective of the result. The way to do that is by leveraging the power of deep links in Android.
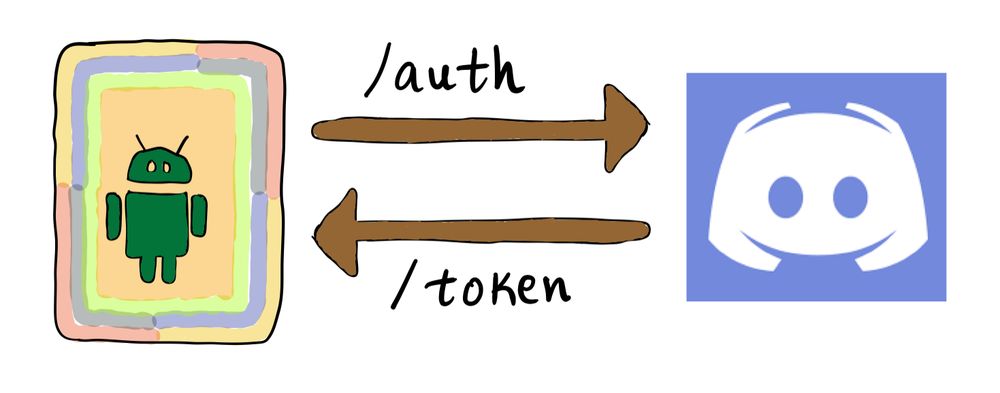
Here is an overview of how the flow would look like:
A user launches the AppAuth Activity, which contains the WebView. The user tries to authenticate – it can either succeed or fail. The response is passed back to the redirect URL; we capture the redirect URL as a deep-link, and the data passed in that deep-link becomes our response.
Go ahead and add this in your AndroidManifest.xml
        <activity
            android:name="net.openid.appauth.RedirectUriReceiverActivity"
            tools:node="replace">
            <intent-filter>
                <action android:name="android.intent.action.VIEW" />

                <category android:name="android.intent.category.DEFAULT" />
                <category android:name="android.intent.category.BROWSABLE" />
                <data android:scheme="droidchef" android:host="oauth" android:path="/discord"/>
            </intent-filter>
        </activity>
The most important part of this snippet is line number 9. It configures the DeepLink scheme that the app needs to catch whenever it is fired by the Android operating system.
The URI configured right now, looks like this droidchef://oauth/discord
It could be in a different format but to keep it simple for the sake of this tutorial, we set the Scheme as droidchef, the Host as oauth, and, the Path as discord.
In the next section, we are going to fire the request and allow the user to authenticate with their Discord credentials.
Wiring Everything Together
Go ahead and modify the loginWithDiscord() method to initialize the AuthorizationService which will provide us an Intent, which we will fire to launch the Discord Auth in the WebView.
fun loginWithDiscord() {

  val serviceConfig = AuthorizationServiceConfiguration(
    Uri.parse("https://discord.com/api/oauth2/authorize"),  // authorization endpoint
    Uri.parse("")  // token endpoint
  )

  val clientId = "put your client id here"

  val authRequestBuilder = AuthorizationRequest.Builder(
    serviceConfig,  // the authorization service configuration
    clientId,  // the client ID, typically pre-registered and static
    ResponseTypeValues.CODE,  // the response_type value: we want a code
    Uri.parse(REDIRECT_URI)// the redirect URI to which the auth response is sent
  )

  val discordScopes = listOf("identity", "email")

  val authRequest = authRequestBuilder
    .setScopes(discordScopes)
    .setCodeVerifier(null, null, null) // THIS IS A HACK, NOT RECOMMENDED, BUT NEEDED
    .build()

  val authService = AuthorizationService(context)

  val authIntent = authService.getAuthorizationRequestIntent(authRequest)

  startActivityForResult(intent, 200)
}
Now, if you call the loginWithDiscord() method and run the app, you will see a WebView like this. However, once the user tries to login or cancel the login, you will not receive any response in the app, yet! Can you guess why?
It is because we have started an activity for result but we are not catching the returned result anywhere. In the next section, we will look into that to complete the whole authentication flow.
Parsing the Authentication Response
In your activity, go ahead and override the onActivityResult(requestCode: Int, resultCode: Int, data: Intent?) method.
    override fun onActivityResult(requestCode: Int, resultCode: Int, resultData: Intent?) {
        super.onActivityResult(requestCode, resultCode, resultData)

        when (requestCode) {
            200 -> {
                resultData?.let {
                    val authResponse = AuthorizationResponse.fromIntent(resultData)
                    authResponse?.let { response ->
                        println("Access Token = ${response.accessToken}")
                    }?: run {
                        val authException = AuthorizationException.fromIntent(resultData)
                        authException?.let { exception ->
                            println("Authentication Error = ${exception.errorDescription}")
                        }
                    }
                }
            }
        }
Here, we are checking for the matching requestCode. since you can have more than one authentication provider, when clause would be a perfect way to handle the responses for each of them.
Next, we check if the resultData is not null and then try to parse an AuthorizationResponse and if that fails we try to parse an AuthorizationException.
Note: Do not log accessTokens or authorizationCodes in production. This is only for demonstration purposes.
Also, here is a snapshot of the possible items you can get from the authResponse :
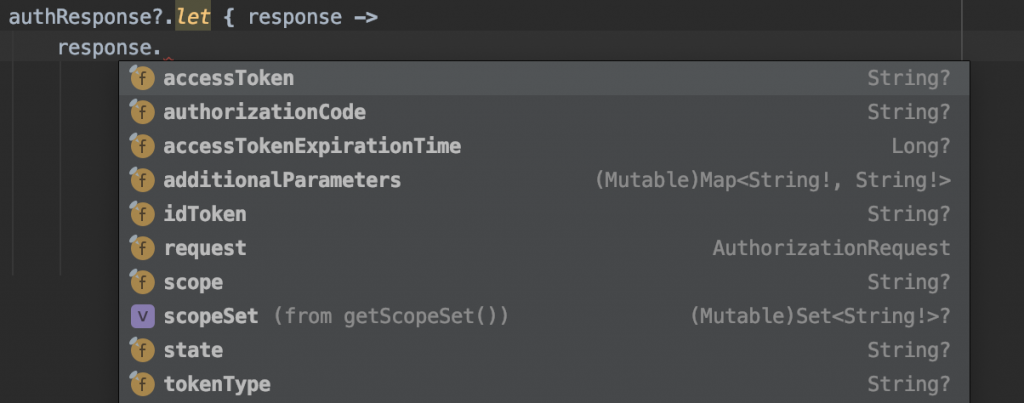
Once you have the tokens and codes that you need, you can decide what you want to do with them and where you want to store them. For instance, you can send it to your own backend or save it on the device in the encrypted storage.
Where To Go From Here?
Congratulations on successfully implementing the Discord Login on Android. I’m sure your discord community will love you for this 🔥
Finally, once you manage to get the Discord Login working in your Android app, feel free to hit me up.
If you’re interested in reading more features about the OpenID AppAuth SDK you can go to this page.
If you find any issues with the tutorial or want to provide feedback on it. You can reach out to me on Twitter @droidchef.


