
Introduction
Mobile test automation often involves testing applications with multilingual content. If you've been using Maestro for Android test automation, you've likely discovered its excellent documentation, intuitive Maestro Studio, and straightforward setup process. However, there's one significant limitation that can block your testing workflow: Maestro cannot input non-English (Unicode) characters on Android devices.
This article presents a complete workaround solution that combines Maestro's JavaScript capabilities with an ADB virtual keyboard to enable Unicode text input in your automated tests.
The Problem: Unicode Input Limitations in Maestro
When attempting to input non-English characters (Korean, Japanese, Chinese, Arabic, etc.) using Maestro on Android, the input command simply fails. This limitation stems from a fundamental constraint in Android Debug Bridge (ADB) itself, which doesn't natively support Unicode character input.
This issue has been documented in Maestro's GitHub repository (#146), where the development team confirms that the limitation exists at the ADB level, making it challenging to implement a direct solution within Maestro.
Understanding the Root Cause
Before diving into the solution, it's important to understand why this happens:
- ADB Input Limitations: The
adb shell input textcommand only supports ASCII characters - Maestro's Architecture: Maestro relies on ADB for Android device interaction
- Unicode Complexity: Non-ASCII characters require different encoding and input methods
The Solution Architecture
The workaround involves three key components working together:
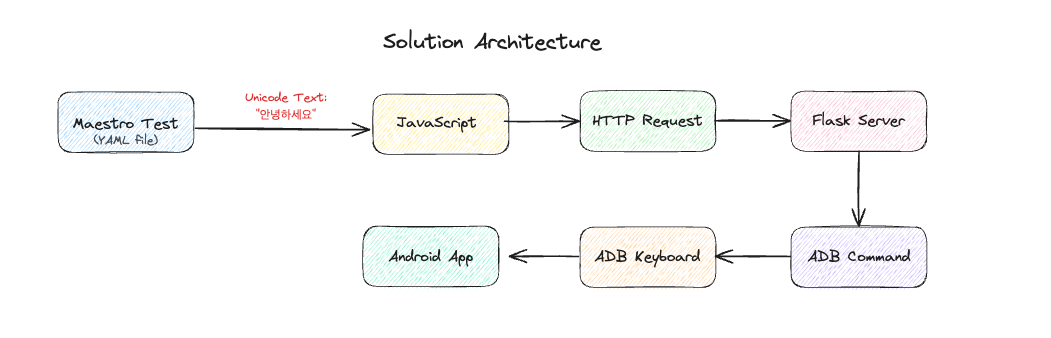
Component 1: ADB Keyboard
ADBKeyBoard is an open-source virtual keyboard for Android that receives text through system broadcast intents. Unlike standard ADB input commands, it can handle Unicode characters properly.
Component 2: HTTP Server
A lightweight HTTP server running on the test machine that:
- Receives text input requests from Maestro tests
- Translates these requests into ADB commands
- Sends broadcast intents to ADB Keyboard with the Unicode text
Component 3: Maestro JavaScript Integration
Maestro's JavaScript support allows us to:
- Make HTTP requests from within test scripts
- Send Unicode text to our HTTP server
- Maintain test flow and assertions
Implementation Guide
Let's build this solution step by step.
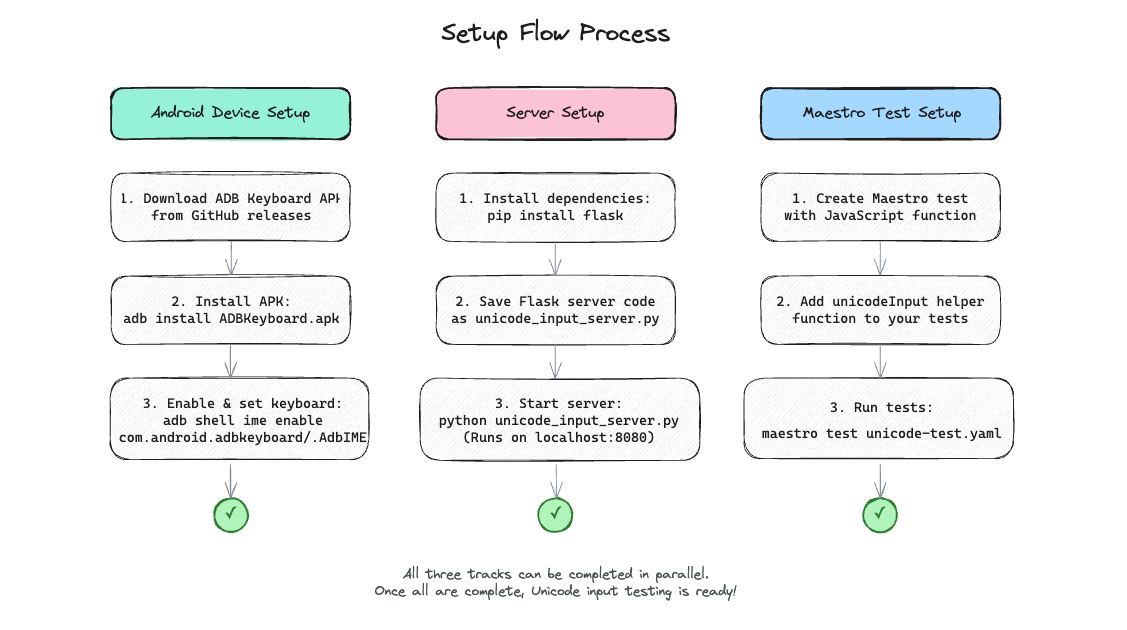
Step 1: Install ADB Keyboard
First, install ADB Keyboard on your test device or emulator:
# Download the APK from the GitHub releases
adb install ADBKeyboard.apk

# Enable the keyboard
adb shell ime enable com.android.adbkeyboard/.AdbIME

# Set it as the current input method
adb shell ime set com.android.adbkeyboard/.AdbIME
Step 2: Create the HTTP Server
Here's a complete Flask server implementation that bridges Maestro and ADB Keyboard:
from flask import Flask, request, jsonify
import subprocess
import base64

app = Flask(__name__)

@app.route('/input-text', methods=['POST'])
def input_text():
  # Get JSON data from request
  data  = request.get_json()

  text = data['text']

  encoded_text = base64.b64encode(text.encode('utf-8')).decode('utf-8')

  command = f"adb shell am broadcast -a ADB_INPUT_B64 -es msg {encoded_text}

  try:
      result = subprocess.run(command, shell=True, check=True,
                              stdout=subprocess.PIPE, stderr=subprocess.PIPE)

      return jsonify({'done': True})
  except subprocess.CalledProcessError as e:
      return jsonify({'done: False}), 500


if __name__ == '__main__':
    app.run(host='0.0.0.0, port=5000)
Save this as unicode_input_server.py and run it with:
pip install flask
python unicode_input_server.py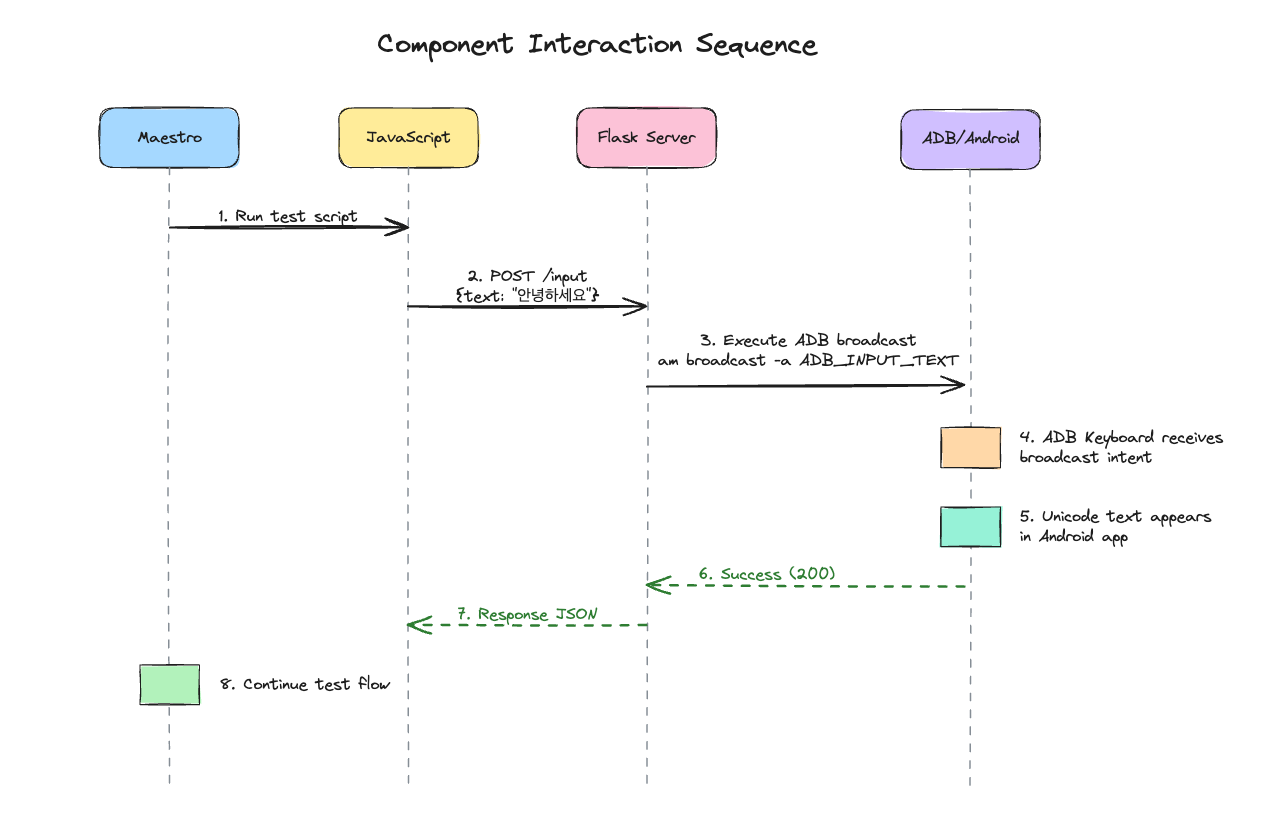
Step 3: Write the Javascript Bridge
This javascript file reads the environment variable textToInput which will be set by our maestro test and then send the request to the Flask server we created above.
const response = http.post('http://localhost:5000/input-text', {
  headers: { 'Content-Type': 'application/json' },
  body: JSON.stringify(
    {
      text: textToInput
    }
})
Step 4: Integrate with Maestro Tests
Now, let's create Maestro test scripts that use this server. Here's a complete example:
appId: com.example.myapp
---

- launchApp
- runScript:
    file: myscript.js
    env:
        textToInput: "新用户名"

- assertVisible: "新用户名"
Benefits of This Approach
- Maintains Test Portability: Tests remain in Maestro's YAML format
- Supports All Unicode Characters: Not limited to specific languages
- Minimal Setup Overhead: Once configured, works transparently
- Debugging Friendly: HTTP server logs help troubleshoot issues
Potential Enhancements
To make this solution even more robust, consider:
- Error Handling: Implement retry logic for failed inputs
- Character Validation: Verify text was entered correctly
- Performance Optimization: Batch multiple input commands
Conclusion
While Maestro's Unicode input limitation on Android can be frustrating, this workaround provides a practical solution that maintains the framework's ease of use while extending its capabilities. By leveraging Maestro's JavaScript support and the ADB Keyboard project, we can build robust multilingual test suites.
This approach demonstrates how creative problem-solving and understanding of the underlying technologies can help overcome framework limitations. As mobile applications become increasingly global, having reliable multilingual testing capabilities is essential for delivering quality software to users worldwide.


